
This is an in depth look at version 1.2 of Orbitas DataBridge powered by Partner Software. This article reviews the new DataBridge module along with some features within the Orbitas environment, and how they're related. For demonstration purposes a sample from a client's mapset is used to illustrate certain features and functions of DataBridge. Its designed to be used as a follow along tutorial that can be related to your own mapset within Partner Map Viewer.

Over on the upper right hand side of Partner Field Design you’ll find the MAPSETS tab. Clicking on this opens up the Mapset options.
You can turn on or off the Published map sets simply by clicking the checkboxes. There is no need to restart the map viewer when turning on or off published mapsets.
If turning on or off any Dynamic mapsets, simply click the “refresh button” next to that mapset to refresh the main viewer.
For this demonstration we’ll turn OFF the Service Areas Mapset.

For this guide a job will be created within Partner Field Design, utilizing a sample from a clients mapset.
Keep in mind, for a standard partner user this job is most likely going to be created and managed by their accounting system. In our case, because we're not connected to a hub, we can just start a new work order and name it anything we want.
We will go ahead and create a new job.
The work order that was just created, work order 0505B, isn't necessarily what the staking technician is going to want to see for a jobname out in the field within Orbitas on iOS.
And that's because there can be a disconnect between that automated work order number and the actual staking job name. That's a very important distinction to make!
We’ll name the job Davidson Road As-built. This job title is clear, easy to understand, and more relevant to the staker.
There is a DataBridge setting that directly relates to the "naming" of the job that will be covered later in detail.
Select our technician for the job and hit OK.
This creates and opens the work order
Under the Quick Links section of the Partner Map Viewer you’ll find the EDIT JOB INFO setting. Clicking this will bring up the Job Information showing both name and technician, along with other relevant information.

A Possible use-case would be doing some AS-building work, but this section has already been added into the GIS from the staking plan or proposed plan.
We're going to start by picking an area on the mapset and zoom into a section of the line.
Find a spot on the line, then click on it to bring up the blue radial menu and hit ( A ) ACTION, then select COPY LINE DATA.
And you’ll notice what happens, not only does it copy the line data, but it creates a parent and the subsequent location.
Clicking on the location and selecting ( E ) EDIT from the radial menu, you can see there's two existing back spans, one central and one neutral, and then all of the associated assemblies.
The associated assemblies were all taken out automatically and given the status of existing because they exist in the GIS.
*An important thing to point out is the information within OTHER MAPPING DATA tab on the LOCATION INFORMATION tab.
These are the guids that relate this mapping data back to the GIS. So that the field data matches the accounting or GIS data exactly.
So it's really important to have that connection there and by performing the “ACTION”, COPY LINE DATA, it takes over that connection so when it's modified and brought back round trip, it's going to modify that feature.
Without that guid, the connection is broken and you can end up with duplicated assemblies and other things like that. So, it's really important for the user to understand that.
*It makes sense when you're doing a staking job, you care about how it views inside the staking sheet, not necessarily what's happening back in the GIS, but of course to your GIS manager, that's going to become real critical.
For this demonstration we’ll stay within the same Partner job.
Another way of interacting with the data would be to just retire the line segment.
Find a spot on the line, then click on it to bring up the blue radial menu and hit ( A ) ACTION, then select RETIRE LINE SEGMENT.
The difference between retiring the line, and copying line data, is the status it gives the units and assemblies.
It's going to put a status of retire on all those assemblies instead of existing.
This is because it's now telling the GIS or the accounting system what to do with that assembly, not just that it's in the job.
Another change that can be made is the line type. It is currently a new overhead and thats what was copied over, so we want to make sure it gets set to retire overhead.
Select Retire Overhead from the dropdown list.
This is a new feature in DataBridge that was not handled in previous versions of the orbitas module or UtiliPad module. The line type, which is the visual reference to that line, is captured right here on the span property.
This data set now has some existing assemblies as well as some retired assemblies.

A quick review of logging with DataBridge and seeing the releationship with Orbitas RMS.
Next, within the Partner Field Design go up to the main ACTIONS menu and select DataBridge , then view orbitas jobs.
We’re taken to the main DataBridge login screen and it's going to ask for a username and password.
*It's important to understand that the Orbitas login credentials are not the same as the Partner login credentials. These are two separate sets of information. The Partner login credentials do not automatically grant access to view the Orbitas jobs associated with that account within DataBridge.
Accessing DataBridge to retrieve Orbitas jobs requires a separate, specific login procedure. To access DataBridge, use the same Orbitas username and password that is used for the Orbitas RMS website. If you are unsure what the credentials are, you can contact your Tri-Global representative.
Use the Orbitas RMS credentials to login and click LOGIN.
Upon logging in, the system will access Oritas RMS, and identify the user of a corresponding subscription, and display all associated jobs within Orbitas.
The Orbitas RMS username and password used for DataBridge can be managed within RMS.
You can refer to the Orbitas support documentation for more information.
*It's important to note another key aspect. Within Orbitas, there is a feature called roles. The most common role is that of a Subscription User. It's highly advised that all stakers who utilize DataBridge are subscription users. This will ensure only their individual account jobs are shown within the jobs list of DataBridge.
There is an advanced role called Administrator. An administrator is responsible for all the jobs and all the users under the entire subscription.
*Its advised to not log in as an administrator with DataBridge, as DataBridge is designed from a user perspective.
*If you only have an administrative account, it's recommended to create a user account.
Further details regarding the definition of roles within Orbits can be found in separate support documentation.
After logging in, DataBridge will immediately display all Orbitas jobs associated with the logged in account.
The first job listed under this account is called “locate” with a date of July 26, 2024.
Reviewing the Orbitas RMS site under the same login, displays the same jobs list as seen in DataBridge, including the "Locate" job with a July 26th date, indicating that the two systems are synchronized.
DataBridge is just simply viewing what is inside of Orbitas RMS for the logged in account, with the benefit of coming directly from the Partner Map Viewer without having to leave or manage anything in Orbits.

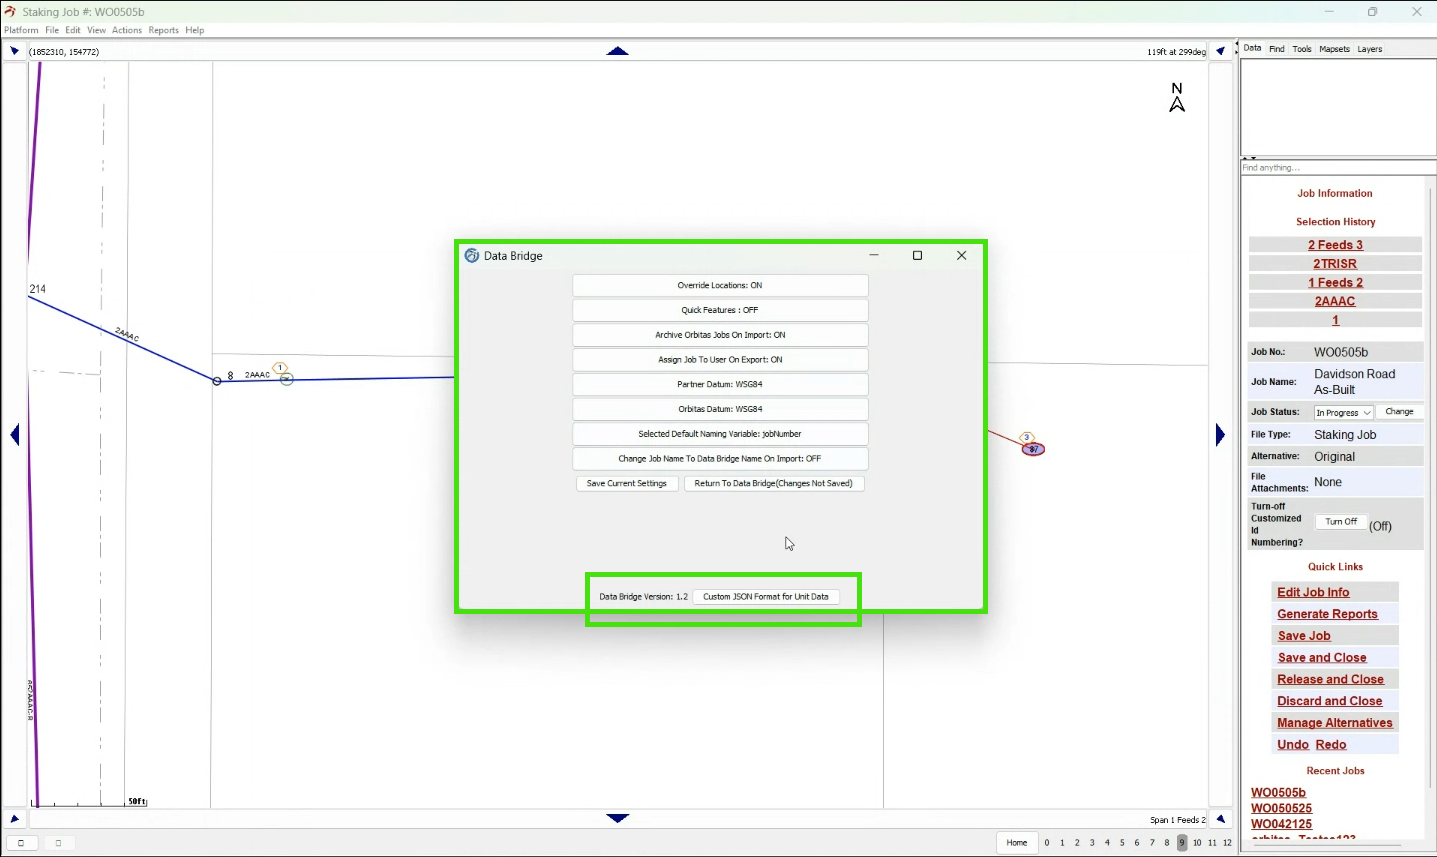
While each setting will be explained in detail later, here are the recommended default settings.
should be turned ON by default.
should be OFF by default.
should be ON by default.
should be ON by default.
The Partner and Orbitas datums should be MATCHING by default. It actually doesn't matter what they are as long as they're the same, The default setting is WGS84.
But as long as the Partner and Orbitas datums are the same, there wont be a DATUM shift.
should be set to JOB NUMBER by default
should be OFF.
DataBridge version 1.2 introduces a custom JSON format for unit data and the capability to utilize custom unit header fields.
This is a new, but very important feature. If these custom header fields are to be carried out, the configuration needs to match the Partner configuration exactly.
For users transitioning to DataBridge 1.2, regardless of prior Orbits account status.
Scheduling a professional services webinar with your Tri-Global representative is strongly advised. This will ensure optimal DataBridge integration and alignment between your partner and Orbits configurations.
For this use case, we're simply going to within the Partner Field Design go up to the main ACTIONS menu and select DataBridge , then view orbitas jobs.
Then select UPLOAD FROM CURRENT JOB. This will send our current job up to the Orbitas RMS website.
A prompt will appear asking if we are sure we wish to upload just in case we clicked on that button by accident. And of course, in this case the answer is yes.
And then it's going to export.
This export process goes into a queue.
As with all web applications, if there's a lot of traffic it could take a few minutes to upload. When there's not a lot of traffic, you’ll see how fast it works.
It'll say export successful. Your export is now completed.
The DataBridge joblist will auto refresh upon completing the export, and in this use case the job called work order0505b that was just created has been uploaded.
DataBridge now incorporates a date timestamp, so multiple versions of the same job up are sent to Orbitas RMS, the versions will be quickly and easily identifiable.
To illustrate this, and a feature within Orbitas RMS, this next section will go into a use case scenario where we have a job of the exact same name that we want to submit. but it's a different version than what is on the website and we want to keep a different version of it. Or other cases where you may need different copies or an alternate version of the job.
By uploading again, the system will automatically create another version with a current timestamp.
Within Orbitas RMS and DataBridge both versions of the job are now uploaded and displayed in the job list. They currently have a status of ACTIVE.
What that status means is that the user selected to auto assign it to themselves on their iPad and is available for that user to download on their iOS device for use with Orbitas on iOS.
Within Orbitas RMS, by revoking this first version it goes to a “locked status” and is no longer active.
This will keep it from being downloaded to the iOS device the next time the user synchronizes.
Refer to the Job Status support note for further details on the different job Status labels within Orbitas RMS.
Back on the iOS device, click on the DOWNLOAD icon to synchronize and check if any jobs are available for the logged in account.
If it says no job to download at this time Tri-Global recommends going into the Orbitas Settings and making sure the account is properly logged in. Also ensure the iOS device is actively connected to wi-fi or a data plan and attempt the download again. It should now synchronize
An alternative way to synchronize is to simply use iOS gestures and swipe up on the Orbitas software and physically close the app, then reopen. This will force the software to log in as well.
If you click on the download icon and it's still saying no jobs to download at this time, then there's likely a problem. Contact your Tri-Global representative.
Well go ahead and delete out the duplicate job to simply the rest of the tutorial but it will allow for a use case scenario. Let's assume that the first job ( the one we just revoked) was the one that wasn't showing up.
A user at the Administrator Level of Orbitas RMS could simply go in and delete the job from the users account. This isnt always the best solution, and the Administrator may not be readily available.
However, a user at the Subscription User can go into Orbitas RMS and see the job status and notice that its LOCKED. This is the cause of the download failure for this particular job.
This can be resolved quickly by sending that job to my device ( the iOS device associated with the user account that's logged in ) to trigger the status as ACTIVE
Then coming back to the iOS device and downloading again, the job appears.
Point of note, as a Subscription User doesn’t have the ability to delete jobs. So in the event of multiple jobs being uploaded, the user could revoke and then archive it so that it's no longer in the job list.

This section of the tutorial is utilizing Orbits on iOS and an Asteri X4i with Orbitas CorrectTM.
Back within Orbitas on iOS, click on the job name to open the job and be brought to the map screen. If paired to a GPS receiver, or if ILS is turned on, Orbitas will automatically Snap to your GPS location.
If paired to an Asteri X4i utilizing Orbitas Correct, you'll see a green locked icon indicating your locked onto what is called a fixed RTK position. As you'll see in the screenshot samples below, the Asteri X4i achieves great accuracy even while in the office!
A great benefit to Orbitas Correct is that it doesn't require anything special to apply. Orbitas Correct just applies automatically provided you are connected to a network and paired to a compatible Asteri GNSS receiver, and have a valid Orbitas Correct license.
Orbitas automatically will “Snap to GPS” as mentioned above.
However, by clicking on the SNAP TO GPS icon in the middle bottom of the screen, it then turns into the PAN HAND icon.
This will now allow the use of iOS gestures to pan around the screen without it snapping back to the current GPS location.
This is a nice option if the job is close by. The user can scroll around the map till the jobsite area is found.
However, in this example, we are in Georgia and the job set we downloaded is in Alabama. So there is another way to utilize that same PAN feature.
With the Pan mode still ON, click the FOLDER icon at the bottom of the screen. This is the Jobs Menu icon and takes you back to my job menu.
Simply click on the job again and it will automatically orient the map and center the job so all points are visible.
This shortcut is useful for making edits to a job on the iOS device when you're not physically at the job location.
This data set was the “Copied Line Data” set from earlier. It consisted of several locations with some spans and assemblies attached.
To view what FORM data has been carried over to Orbitas from the sample data taken from the Partner Map Viewer map set, click on a location and select FORMS from the quick menu.
In the below example you can see some form data on the final location. The existing and retire assembly information in both units and spans were carried over from the example in Partner Map Viewer.

Should you be in the field and find that a location is off or incorrect. Instead of deleting and recollecting the point and having to add in all the assemblies again, you can simply use the GPS Move feature.
The GPS Move feature will take a location's feature data and “move” to your current GPS location.
Click on the location that needs to be adjusted and select EDIT from the quick menu.
Scroll down to the bottom of the form, and click on the GPS MOVE icon.
Clicking on that icon will update the location to the device's current GPS position.
You will receive a message that the location has been moved.
And you can SAVE your location with the new GPS position without having to recollect everything.
As shown below the position was moved from the job site in Alabama, to where my GPS position currently is in Georgia.
This feature can be used for demonstration purposes or quick edits in the field
Another feature within Orbitas is being able to Edit the collection form after collection.
Click on a previously collected location and select EDIT from the quick menu to bring up the collection form.
You can click on any longitude or latitude value and re enter the correct coordinates. To fix any possible GPS Move mistakes.
You can also change the naming values.
One useful thing is to maybe put in a poll tag number. There are several use cases for physically typing in the poll tag number instead of using just the naming convention.
These conventions inside of Orbitas do carry over into Partner.
Make sure to hit SAVE if any changes are being made to the location.
If any changes to the map were made and not being displayed, simply click on the FOLDER icon at the bottom of the screen and reselect the job to refresh the map and center the job again.

You can add new locations to the map by either collecting with a paired Asteri GNSS receiver, or using a feature within Orbitas called TAP TO PLACE. For this next example we used this feature to get our Location.
For more information on the Tap to Place feature, check out the Orbitas support documentation.
Once collection begins, the collection form appears.
The naming convention starts at location one, because technically this is the first location actually being collected inside Orbitas.
For this use case, this location is going to be a service drop location. So, the name will need to be edited and can make use of a naming feature as well because we are adding to a job with other locations.
In this example the location will be named service drop. And the numbering process will start at four. So this will be the fourth location collected.
Make sure to hit SAVE on the location to save all changes.
The FORMS that are generated in the next screens are purely configuration based.
Based on the configuration that is tied to the subscription and download on the iOS device, the particular dropdown filter trees will have all assemblies available to fully detail out the location.
Now that we have a newly added Location, we can utilize a key feature within Orbitas.
Within Orbitas there is a feature called SPANOFF.
For more information on utilizing the Span Off feature, refer to the Orbitas tutorials.
To quickly utilize the spanoff feature, click on the ACTIONS icon at the bottom of the screen, then select the SPAN OFF icon.
The map now displays the edited locations, as well as the span off locations.
If you dont see the span off locations, you can open the ACTIONS menu and click on the REFRESH icon.
The FIND feature can now be used with the accuracy of the GPS to locate these positions in the real world.
The span off points are on the map now, and can be fully edited just like the other collected locations. That includes adding unit assemblies, changing line types, naming conventions, and more.

The final steps are to upload the Orbitas iOS job back into DataBridge then into Partner Field Design for final use.
To upload any Orbitas job, simply click on the FOLDER icon which brings up the job menu.
Click the CLOUD upload button to upload and receive the message JOB UPLOADED. The icon will turn green to let the user know that that job has been successfully uploaded.
Taking a look back over in Orbitas RMS, the job will be displayed in the job list for that user..
Clicking on the job within Orbitas RMS will allow those modified features to be viewed.
Ensure a job or work order is open, then Under the ACTIONS menu select DataBridge and select View Orbitas Jobs.
All the Orbitas jobs associated with that subscription user are displayed again, including the most recently uploaded job at the top of the list.
Click on the import into current job button next to the job you wish to import.
A prompt that the Import has been completed successfully appears.
Close DataBridge to view the completed job.
All edits and additions made including moved locations, edited names, assemblies, and changes to the line types are all recorded and carried back into Partner.*That's a new feature in DataBridge. The line types are going to be carried over. It's also important to note that under location information, all the same GUIDs are still present. DataBridge can now handle all that guid information so when you're doing existing jobs in AS-building, it will carry those guids back into your GIS or accounting software.

A review of the advanced features within DataBridge that a subscription user may find benefical.
Turning this feature ON will automatically archive the job within Orbitas RMS after importing into Partner Map Viewer. Archived jobs are no longer visible in that user's Orbitas RMS or DataBridge jobs list.
Turning this feature OFF will keep all jobs in the Orbitas RMS and DataBridge job lists after import.
SAVE CURRENT SETTINGS after any changes have been made.
Please note only an Orbitas Administrator can restore Archived jobs.
Turning this feature ON will override any locations with what is currently in the job that is being imported. A normal use case for this feature being ON would be during AS-Building when you want to update the current work order with what has recently been modified out in the field.
Turning this feature OFF will act as an “append” and allow the user to simply add on to the current job with what was collected or modified in the field.
A good way to tell if this feature is ON would be to look at the locations list on the FIND tab after import and only seeing the new locations from the imported job listed.
SAVE CURRENT SETTINGS after any changes have been made.
Tri-Global advises keeping the Partner and Orbitas Datum’s the same. If the two datums are not matching, a datum shift can occur resulting in inaccuracies.
SAVE CURRENT SETTINGS after any changes have been made.
Selecting Job Name as the variable will set the Job Name to be used in the DataBridge naming convention. Job name is taken from Partner Edit job information on the Accounting Tab.
Selecting Job Number as the variable will set the Job Number to be used in the DataBridge naming convention. Job number is taken from the Job number based on an existing or created job.
SAVE CURRENT SETTINGS after any changes have been made.
Turning this feature ON will allow DataBridge to change the job name to the DataBridge name on import.
In most cases by default, users will select the job number. However, there are some use cases where the job name is preferred instead and this feature in DataBridge allows for that.
SAVE CURRENT SETTINGS after any changes have been made.
A quick feature is intended from a Tri-Global perspective to be dynamic lines and areas that are quickly created. Some examples could be a road center line, a fence line, or a pond. Those are some examples of things that aren't part of our utility job, but are maybe important to the staking sheet. Within Partner, these are known as drawing features.
Fat road, fence line, road, septic line, tape measure….. These are all examples of what Tri-global would call a quick feature within Orbitas, but a drawing feature inside of Partner.
This setting enables the transfer of drawing features between the co-op and Partner/Orbitas systems.
It requires a custom configuration, which will be established for the co-op through a professional services agreement.
DataBridge now supports the collection of non-staking oriented features using Tri-Global quick features within Orbitas.
This feature is disabled by default because it's an advanced TriGlobal configuration, requiring a professional services session for implementation.
Q. What is the max amount of Orbitas jobs you could be imported into one partner work order?
A. There are likely no strict limits on the number of jobs that can be imported into one partner job when the location override setting is off. The system will append all imported jobs, even if their locations differ.
While a practical limit may exist (e.g., performance issues with an extremely large number of jobs like 10,000), there is no intentional restriction on importing multiple jobs into a single partner job.


